

Share
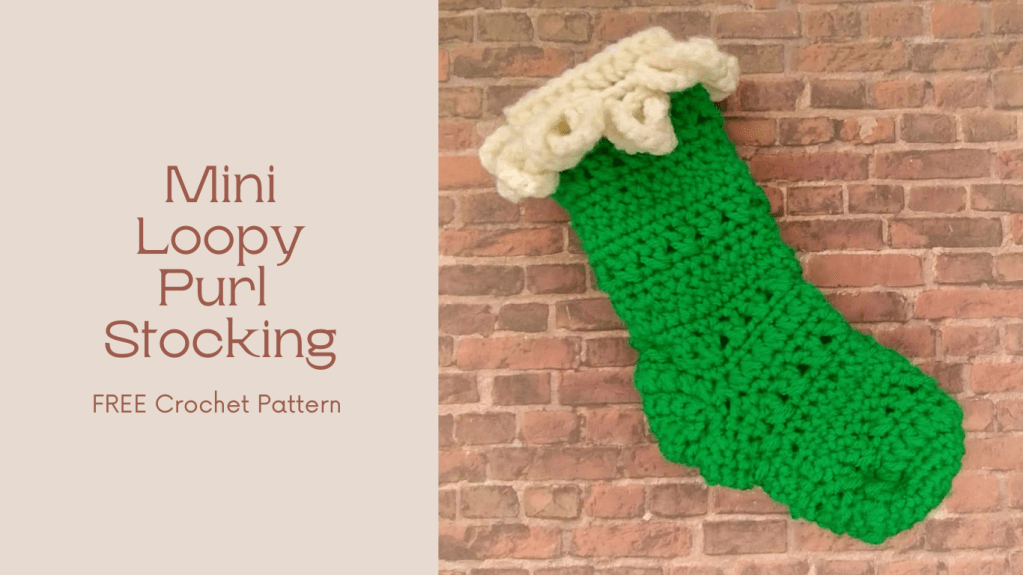
The Mini Loopy Purl Stocking is fun to make and a great addition to your holiday decor. Make these for your furry friends or create a cute bunting with several of these whimsical stockings!
The great thing about this stocking is the gorgeous texture that the tunisian purl stitch gives. If you have made any of my Crossroads patterns that are crocheted using the tunisian simple stitch, you can do this stitch! Don’t worry, instructions are given on the pattern pdf and there’s also a separate tutorial post that shows you step my step how to crochet the tunisian purl stitch. An optional loopy edging can be added for a fun and whimsical touch.


Subscribe to OVC Designs!
Get updates on the latest posts and more from OVC Designs straight to your inbox.
The Mini Loopy Purl Stocking is a gorgeously textured pattern designed as a miniature option of the Loopy Purl Stocking pattern and is 4″ wide and 10″ tall.
This pattern is written here using US crochet terms.
You will learn how to do the tunisian purl stitch in making this pattern. The PDF is available in my Ravelry and Etsy shops and it includes photos to help you with these stitch patterns and don’t forget there is also a free Tutorial.
This pattern has been tested for errors by a team of crocheters with varying skill ability, this helps to ensure the pattern is free of errors, but should you find any errors or run into difficulties please reach out to me so I can help.
NOTE ON SELLING ITEMS AND COPYRIGHT: The pattern and all images are Copyright Owensvillachick Designs, all rights reserved. You may not copy any part of this pattern or use photos without permission. You may sell finished items (handmade in small quantities by you). Designs credit is apprecieated (tag on social media or link to this post). Thank you.
Just browsing? Pin it for later!
Skill Level
Advanced Beginner. Uses simple, common stitches and techniques. Tutorials available for tunisian purl stitch and loopy edging.
Recommended Yarn
Any worsted #4 weight yarn approx. 35 yds/32 m
Yarn used: I love this yarn in shade Jelly Bean, 355 yds (325 m) per 7 oz (198 g).
This is a lovely acrylic yarn that is very soft. I used it because I already had it in my stash and knew it was a great yarn for a cozy stocking.
Subscribe to OVC Designs!
Get updates on the latest posts and more from OVC Designs straight to your inbox.
Hooks & Other Materials
- US Size J/10 or 6 mm hook
- Yarn Needle
- Stitch Marker
- Scissors
Sizes/Finished Measurements
Size is approximate and may be slightly different based on ability to meet gauge. 4″ x 10″ (10.16 cm x 25.4 cm)
Abbreviations
Ch(s) – Chain(s)
Dc – Double Crochet
Hdc – Half Double Crochet
Hdc Cluster (See Special Stitches)
TPS – Tunisian Purl Stitch
MC – Magic Circle
Rd(s) – Round(s)
Sc – Single Crochet
Slst – Slip Stitch
St(s) – Stitch(es)
Yo – Yarn Over
Notes
- Stocking worked in unturned rounds.
- Ch 1 does not count as a stitch.
- Ch 3 does count as a stitch.
Gauge
With US size J/10 (6 mm) hook: 4 sc and 4 rows = 1 “/2.5 cm. Adjust hook size if necessary to obtain gauge.
Special Stitches/Techniques
Hdc Cluster: Yo, insert hook, yo, pull up a loop, yo, insert hook, yo, pull up a loop, yo, pull through 5 loops on hook. Repeat starting each hdc cluster in same st as previous st ended
Crossed Double Crochet: Skip a st, dc in next st, dc in skipped st working behind previous dc made
Tunisian Purl Stitch (see photo tutorial)
Loopy Edging (see photo tutorial)
Subscribe to OVC Designs!
Get updates on the latest posts and more from OVC Designs straight to your inbox.
Instructions
TOE, ARCH & HEEL
Begin with a MC or ch 3 and join to 1st ch to create a circle.
Rd 1: Ch 1, 8 sc in MC, join. (8 sc)
Rd 2: Ch 1, 2 sc in each st around, join. (16 sc)
Rd 3: Ch 1, (Sc, 2 sc) repeat 8 times around, join. (24 sc)
Rd 4: Ch 1, sc in each st around, join. (24 sc)
Rd 5: Ch 1, hdc Cluster blo in each st around, join. (24 sc)
Rd 6: Ch 1, sc in each st around, join. (24 sc)
Rd 7: Ch 3, dc behind into last sc of previous rd, work 11 crossed dc’s around, join to beginning of ch 3. (12 crossed dc)
Rd 8: Ch 1, sc in each st around, join. (24 sc)
Rd 9: Ch 3, TSS in 1st st, TPS in each st around, join. (1 TSS, 23 TPS)
Rd 10: Ch 1, sc in each st around, join. (24 sc)
Rd 11: Ch 3, dc behind into last sc of previous rd, work 11 crossed dc’s around, join to beginning of ch 3. (12 crossed dc)
Rd 12: Ch 1, sc in each st around, join. (24 sc)
Do not fasten off. Continue to heel flap.
HEEL
You will work the heel flap in turned rows.
Seam the flaps closed using the mattress stitch prior to moving onto the body.
Row 1: Ch 1, sc in next 10 sts, turn. (10 sc)
Row 2: Ch 1, sc, sc2tog; repeat once, sc in last st, turn. (7 sc)
Row 3: Ch 1, sc, sc2tog; repeat once, sc in last st, turn. (5 sc)
Row 4: Ch 1, sc2tog, sc, sc2tog, turn. (3 sc)
Row 5: Ch 1, sc3tog, turn. (1 sc)
Row 6: Ch 1, 3 sc, turn. (3 sc)
Row 7: Ch 1, 2 sc next, sc next, 2 sc next, turn. (5 sc)
Row 8: Ch 1, (Sc, 2 sc); repeat once, sc in last st, turn. (7 sc)
Row 9: Ch 1, (Sc, 2 sc); repeat twice, sc in last st, join to beginning heel row, turn. (10 sc)
Row 10: Ch 1, (Sc in each st across, join to beginning heel row. (10 sc)
Do not fasten off. Secure with a stitch marker.
Using a 12” length of yarn, seam both sides of the heel flap closed using the mattress stitch.
Weave in ends.
Continue to body section.
BODY
Rd 1: Ch 1, hdc cluster blo in each st around, join. (24 hdc clusters)
Rd 2: Ch 1, sc in each st around, join. (24 sc)
Rd 3: Ch 3, dc behind into last sc of previous rd, work 11 crossed dc’s around, join to beginning of ch 3. (12 crossed dc)
Rd 4: Ch 1, sc in each st around, join. (24 sc)
Rd 5: Ch 3, TPS in each st around, join. (24 TPS)
Rd 6: Ch 1, sc in each st around, join. (24 sc)
Rd 7: Ch 3, dc behind into last sc of previous rd, work 11 crossed dc’s around, join to beginning of ch 3. (12 crossed dc)
Rd 8: Ch 1, sc in each st around, join. (24 sc)
Rd 9: Ch 3, TPS in each st around, join. (24 TPS)
Rd 10: Ch 1, sc in each st around, join. (24 sc)
Rd 11: Ch 3, dc behind into last sc of previous rd, work 11 crossed dc’s around, join to beginning of ch 3. (12 crossed dc)
Rd 12: Ch 1, sc in each st around, join. (24 sc)
Rd 13: Ch 1, hdc cluster blo in each st around, join. (24 hdc clusters)
*Count 10 sts and place st marker.
Fasten off MC and weave in ends.
Continue to loopy edging.
LOOPY EDGING
Join white yarn in stitch previously marked.
Rd 1: Ch 1, sl st in each st around, join. (24)
Rd 2: Ch 1, sl st blo in each st around, join. (24)
Rd 3: Ch 10, rotate stocking around with top inside of stocking facing towards you. Working into back (bottom) loops of round 1: (sl st next 2 sts, ch 12, sl st in 3rd ch from hook and next 10 chs, sl st next st, ch 12, sl st in 3rd ch from hook and next 10 chs, insert hook into ch-2 sp then sl st next st pulling through all layers on hook, pull 1st chain worked thru center of loop just created, insert hook into ch-2 space); repeat around. Sl st last 2 sts. (4 Loops)
Rd 3: Sl st in back bumps of ch 10, working into back loops of round 2: (sl st next 4 sts, ch 12, sl st in 3rd ch from hook and next 10 chs, sl st next st, ch 12, sl st in 3rd ch from hook and next 10 chs, insert hook into ch-2 space, sl st next st pulling through all layers on hook, pull 1st chain worked thru center of loop just created insert hook into ch-2 space); repeat around. Sl st next 4 sts. Rotate stocking around with top of stocking facing away from you. (3 Loops)
Rd 4: Ch 1, sl st into blo of round 2 stitches, join. (24)
Rd 5: Ch 1, hdc clusters blo in each st around, join. (24) Fasten off and weave in ends.
Congratulations, your Mini Loopy Purl Stocking is complete!
Christmas in July Savings Hop 2024

As part of the Christmas in July Savings Hop 2024, the Mini Loopy Purl Stocking is available for only $1.50 on July 23rd 2024.

Simply click on the download button and type in the coupon code at checkout!

Don’t have the coupon code? Simply click on this link to grab it before clicking the download link.
Why not check out my other crochet patterns too. I’d love you to have a look around while you’re here.
Please share the link and pin it! And show me if you make it, I’d love to see. Tag me on social media.

Be sure to check my Sales & Promos Page for hops and happenings at OVC Designs!
Until Next Time, Happy Yarning!
ETHY

Subscribe to OVC Designs!
Get updates on the latest posts and more from OVC Designs straight to your inbox.

Leave a reply to How to do the Loopy Edging – OVC Designs Cancel reply